Saturday, 30 January 2010

My first fab bargains in Poundland

I'm always looking in our local Poundland, but never manage to find any of the crafty bargains, that people on MSE mention, but today I did, and am so happy!.


I needed some storage for my A4 card stock because the box I was using is looking pretty battered, so today, whilst wondering around Poundland I found these.

I thought that these would be perfect, so bought 6, thinking that would be enough, but how wrong I was! By splitting the card into colours, I realised I had a lot more than I thought - ooops - so had to go back out into town to get another 6. I have learnt my lesson in Poundland, that if you don't get things when you see them. When you've decided that you want it, and go back to get it, it has always gone. So I have spent the rest of this afternoon sorting through my card and now my card stash looks like this -

Really impressed, and now I can easily choose my colours when crafting rather than looking through a box full. My only problem is where to put them.

A few cards that have arrived for me this week

and I love each one of them.

This one was from Oona, and came with some stamped images and 3 promarkers.


Then I got this one from Jane (Bunbun) as a thank you for the Sizzix dies I sent her:


and finally this one arrived yesterday and is from Tom to say thank you for the stash I sent him.


Thank you very much all of you. xx

Friday, 29 January 2010

I've been so busy this week at home and work, that I haven't had much time to blog, so to make up for it here are 3!

I was so impressed that Louisa's 9 year old son Tom, made cards to sell at his school to raise some money for Haiti, that I wanted to send him a little something to say well done for thinking of others, so I sent him his very own crafting stash. Now we all know that we all have too much stash to ever get through, so I spent an hour or so last Saturday, sorting some bits and pieces out that I thought he might like to send him. I forgot to take a photo of it all, but there was lots, I got carried away a bit and there was enough to fill an A4 jiffy envelope.

Having done a craft stash swap in the past with Louisa through Crafty Place, I had sent her a box, that had a few sections in it and would hold things like embellishments and brads etc, and I know from what Louisa told me, Tom wanted it. So as part of the stash I sent him, I sent him his very own 'bits and pieces' box to put some of his new stash in.

This is the card I made to go with it:


I found the image on my PC, and thanks to the girls on MSE I know now that it is called Edwin Fishing, and thought it would be perfect to use on a card, so I coloured it in with paintshop pro, and matted it onto an easel card.

All the card/paper used to make it came from a pack from poundland, and the letters for Tom, were printed out on the craft robo.

I was really please how the card turned out, I enjoy making easel cards, as they are so easy to do.

I hope Tom liked it too.

A card to say thank you

I made this card for Oona, over on MSE, as a thank you for sending me some stamped images, and promarkers. I had promarkers on my Christmas list, but Santa didn't bring me any, so Oona has started me off on my collection. I don't have the most steady hands in the world, but I am impressed at the way they work, and have tonight been trying some out.

I made this card before the promarkers arrived, so this is an image that I have had on the PC and coloured it in using paintshop pro - think it will take me a while to get up to this standard of colouring with promarkers!

The image has been cut using deckled rectangles in the cuttlebug, and the silver sparkly matting is the glitter film, that I picked up in hobbycraft the other week. The ribbon is some from my stash, and the purple card, an off cut.

Buttons........

You just can't have enough can you!

I don't often use buttons in card making, but recently I have seen some really gorgeous cards that have a few on.

I had to go to our local haberdashery shop on Saturday, to get some ribbon, and wanted to get a few buttons to try them out on cards. I was looking through the racks and there was so much choice, but didn't really want to pay 10p a button. I just happened to look down on a lower shelf and found a mixed box full or shapes and colours, and a sign that said 'the whole lot 50p'. Not one to turn down a bargain, I bought them, and when I got them home it sorted them out into colours. Having counted them, there were 232. I was well impressed!

There was a huge variety of colours, design, and, so once sorted out they now look like this:


Thursday, 21 January 2010

My challenge card for Sketch and Stash; Allsorts Challenge and Papertake Weekley

Iv'e had a really busy week, so haven't done much in the way of crafting. But tonight I have made this 'new home' card, for my Aunt and Uncle who have just moved. I enjoyed working with the sketch and hope you like my interpretation. I am also entering this into the Allsorts Challenge, which is to use pink and brown. There is a lot of pink on this card, and brown in the spots and stripes. Another challenge I can enter this card for is the Papertake Weekly Challenge as it covers pretty and pink!

For the sketch taken from the Sketch and Stash blog, I have used a square white card from Anita's, and a lot of stash that I have had for a while. The backing pink card, and the light pink card are bits from the very first box I ever bought from the PaperMill about 2 years ago. I've 'swiss dotted' the pale pink card through the cuttle bug. The scalloped and plain circles were cut with my nestabilities, and the scalloped circle is some gemstone card that I got for Christmas, and I love it!

The image was a freedown load a while ago from The Creative Cottage, and I have printed out the spots and striped paper from part of the Creative Cottage kit. The ribbons were from my stash, and although you can't see them very well I have added 3 clear stones to the middle of the 3 dots on the bottom of the spotted paper. The 'New Home' sentiment was printed out on the PC in gold and cut using lables 4 nestabilities. I really like this card, and have enjoyed following the sketch.

My OH has made another....

card on the craft robo.

He is very pleased with himself for doing a boy's card, and I have to say it does look pretty effective. Everything on this card was cut with the robo, from the letters to the football and goal.

I think it looks fab, and I guess we could do the writing and add a logo in appropriate colours for any football team. Think my oldest will get this one for his birthday in March.

Saturday, 16 January 2010

Cute Card Thursday and The Pink Elephant Challenge Card

Cute Card Thursday want challenge cards that use pink and grey; and the Pink Elephant's theme is 'birthday' so here is my entry in to both challenges:


I've had this image on my PC for a while, and thought that the colours I had used to colour it in paintshop pro, fitted in perfectly with this Challenge.

I have used a square white card, onto which I have put a base card of grey, which has been 'swiss dotted' through the cuttlebug. I have then matted the image onto a pink scalloped square.

To the corners I have added some card flowers that my OH has designed and printed on the craft robo - I love these as you can 'lift' the middle of the petals to give the flower a 3d effect. I have added a green eyelet to the middle of the flower, now that I have worked out how to do them with my crop-a-dile (it's only taken me about 9 months to get it right!).

In the corner I have added a length of ribbon from my stash with a 'Happy Birthday' peel off.

My OH has been at it again...

designing on the Craft Robo.

I am still managing to keep up with him in using what he designs and cuts out and below is the latest card that he gave me to work with. When he gave it to me it was just a pink card with the heart 'stencil' in the middle cut out, and I thought what the hell do I do with this. I couldn't put red with it as it would have clashed badly, and after a few days of pondering I decided that pink and black go, so here we have my very first valentines card for this year.


Having asked my OH for a bit more design to go with this card he has printed me out some black heart corners, which when I put them one made the card look better but there was something missing for the middle, so I decided to add a circle of black to the card to highlight the pink heart 'stencil' better. To finish the card of I have layered a black and pink love heart to the middle of the black card, and think it looks quite effective.

Not sure whether I like the card or not, as I am not into pink, but think the card has come out quite well, and would like yo enter it into this week's One Stop Craft Challenge which is corners/fancy edges.

Wednesday, 13 January 2010

My Allsorts Challenge Card

There is a great Challenge on the Allsorts Challenge blog this week for which I have made this card.

I've used a piece of red paper from Papermania 'Simply' Elegant, that was the first paper pack I ever bought about 3 years ago, which I have backed onto a piece of red handmade paper. Since I am in love with the 'craft robo' butterflies I have added one to a circle of handmade paper, which is matted onto a white scalloped circle.

I have added a piece of ribbon with a peel off for the sentiment to finish off the card.

Really pleased with this card, and using up some of my very 'old' stash.


Having made the challenge card above, I liked the layout so much that I had to do another using some black and white paper that I ordered off ebay the other day.

For this card I have cut 5 strips of paper/card, 2 of which have been 'swiss dotted' in the cuttlebug, and added the same butterfly to a piece of black card backed onto a white scalloped circle.

On the left I have tied a black bow with organza ribbon, and added a 'Happy Birthday' peel off to the bottom of the card straight onto some black cardstock.

I so love black and white at the moment, not sure why, but think it is just so elegant.

Tuesday, 12 January 2010

OHs Challenge card for MSE Challenge

OK, after last nights effort that took him 3 minutes to do, my OH spent a lot of time last night creating this card for the MSE 'Back to Basics' challenge using his new toy the 'Craft Robo'.

The card has been made, just using pink and white card, on the Craft Robo, he has cut away the righthand corner to the shape of the top of the butterfly, and then made some butterfly corners to add to the other 3 corners.
He then printed out the white board, to stick the pink 'Happy Birthday' greeting on. Think he found it a bit tricky to stick the writing on, as he chose quite a fiddle font, and the letters ended up being a bit small.
I think it is a great card, particularly since it was made by a man, and absolutely love the butterfly, which I think will start to appear on a lot of my cards.

Monday, 11 January 2010

Challenge card for MSE Challenge

Susan aka TomsMom has set a fab challenge over at MSE which is:

  1. to try and use just card stock, that doesn't need covering with backing papers; and

  2. stick to just two or three things to put on it ie. stamped image and ribbon.

Well this is the card that I have made using just black and white.


I have used a blank white card (51/4" x 5 1/4"), which I have embossed with a 'happy birthday' folder. Onto this I have put a black square, which has been put through the cuttlebug using 'swiss dots'. My OH has made the butterfly topper with the Craft Robo.

To finish the card I have just added a length of black ribbon down the left hand side.

I think the card looks fab and pretty elegant, and will definitely be making more like this in the future.

It will also be one way of using up my coloured scraps of card.

Thanks for setting a fab challenge Susan. I really enjoyed making this card, and have to say it is probably the quickest one I have done at 15 minutes! Hope it doesn't look like I've done a quick job on it!

My OHs Challenge Card.......

Whilst sitting making my Challenge card for MSE (see above), my crafty OH decided to do his own. Susan, you wanted basic, so that is what he has done, and just used felt tip pens and a piece of card.


He thought it was a great idea, until I told him that I think it was Rusty, who made one like this using the PC sometime last year!

He is cuffed with it, and impressed that it only took him about 3 minutes. However, as I told him, it looks like that is all it took him!

He is currently doing some printing out on the craft robo, so will shortly be submitting another entry.

Friday, 8 January 2010

Another card using the Craft Robo

My OH is now really into the software for the Craft Robo, and has tonight cut out a lattice aperture window card in white. OK I probably wouldn't have done a card using this kind of design, and must admit that I did struggle with how to make it into a card.

I love purple and flowers, and using the self adhesive glitter film that I bought at Hobbycraft at the weekend because it is so easy to stick. This is what I have come up with:
Not sure if I like it or not, but think I have done quite a good job with the blank aperture he gave me.
I have used purple card and glitter film to frame the lattice. Added some glitter ribbon that I had in my stash to the left and bottom, and finished it off with a layered flower and brad; little purple butterfly; and a 'Happy Birthday' peel off backed on to some purple card, and raised with foam pads.
I have decided to challenge myself this year with my card making, and have decided that whatever he designs and prints out on the Craft Robo, I must try to incorporate them into a card.
Who knows what he will come up with, so watch this space!
This is the card that I will enter into this weeks One Stop Craft Challenge which is something that begins with 'B'. My 'B' is for butterfly.

Snow in Surrey...

Finally had time to upload my snowy pictures. We have probably had about 4" althogether, and is wasn't until yesterday that my boys went out to play in the garden, since both their schools were shut.

This is what it looked like 'pre-kids', soft, white and snowy. Really picturesque, with only our cat's footprints in the snow:

and this is what it looks like now it has been 'kiddified'!


They had a great time playing out, and really enjoyed being 'snow angels'!

My Allsorts Challenge card for this week

Here is my entry into the Allsorts Challenge in which you either have to use old stash or new bits and piece, by following their sketch.

For this challenge I have used 'old' bits and pieces. The backing paper is from the very first pad I ever bought about 2/12 years ago, and the Thank You peel offs are from when I got married almost 3 years ago and had to make and write my thank you cards. The image is just something that I have had on the computer for a while, and the card used is pretty old too.

I've loved doing sketch cards lately, as it gives me inspiration, which recently has been severely lacking.

Wednesday, 6 January 2010

A card that I absolutely love...

I'm always looking for inspirations for new card designs and whilst 'blog hopping' last night came across a fab layout on MrsBsBlog which I felt inspired to try. This is my creation, and although it took me ages to decide which of my papers to use to go with the image, and to cut out all the matted layers I am really pleased with the result, and my next 10 cards will probably look very similar!

The image is the same one I used on the MSE challenge the other day, and I think the paper is Basic Grey - Sultry. I have used verious 'nesties' to cut the squares, circle and scalloped circle, and then just added some glittery ribbon and gems from my stash.

Monday, 4 January 2010

My Husband has made his first card using the Craft Robo

My OH's brother is moving house on Wednesday, so tonight my OH has been playing with the software for the Craft Robo and designed and made his first card with it. I had to give him advice as to the wording as he was going to just put 'Congratulations' on it, and told him to mat the house and put a backing paper on so the card wasn't too plain just being blue and white. This is the result and he is pretty chuffed with it:

With all the bits and pieces he bought at Hobbycraft at the weekend, it looks as though our house will have a his 'n' hers crafty corner!

MSE SKETCH CHALLENGE CARD

Rainmac posted a great sketch card to create a few days ago, and this is my creation for the challenge:
I have used an digital image that I have had for a while, which has been coloured in using Paintshop Pro. This has been cut out using the 'bug' and deckled rectangles. You can't really tell from the photo but the scalloped circle has been cut out on some self adhesive glitter film, which I managed to pick up at the weekend from Hobbycraft for 62p for 3 A4 sheets. I couldn't resist this bargain and ended up getting it in 3 different colours. I love it as I don't have to fiddle with DST/glue to stick it down!

The image and scalloped circle was backed onto some purple card run through the bug with swiss dots, and to finish it off I used a bit of glitter ribbon on the left hand side, and cut out a label on the glitter film and added a peel off. Really happy with this card, and love the sketch used. Thanks Rainmac on setting a great challenge.

My first cards, using my Craft Robo

Well, after my OH gave me a Craft Robo for Christmas, we have had a play, and have managed to make this card with it, from a template I bought from here.


From what I have seen of the machine and softwear, it will be able to produce some amazing things, and I certainly have a lot of learning to do. Whether I master it, I don't know, and I know how lucky I am to have been given it, but for the time being I have to admit that I still like my DST/scissors/cards and papers.

For my second attempt I made some thank you cards, which didn't exactly turn out how I wanted them to look, but are a bit different even if a little bit too plain:

Sunday, 3 January 2010

My Christmas swap presents from Choccy

I'm on a roll tonight with posts on my blog, but just wanted to say a huge thank you to Choccy over on MSE for the fantastic Christmas swap presents that she sent me. She has chosen the presents well, and I love all the fab papers she sent as well as the brads and embellishments. The new cuttlebug 'B' plates will be well used too, and will shortly replace my 'manky' ones that really have seen better days. Thank you so much Choccy xx

I have a crafting buddy (well for a few more days anyway)

My niece has been staying with us for almost a month now, and being quite arty, she has spent some evenings making some last minute cards with me, late into the evening in the few days leading up to Christmas. It has been great to have a crafting buddy, and I will miss here when she goes home on Sunday. We were too busy talking, making and writing cards to remember to take photos of all of her creations, but here are a couple. This one she made for my mum:

And this one for her Grandad, using scalloped and plain circles.

A bit late, but my last minute Christmas cards ... part 1

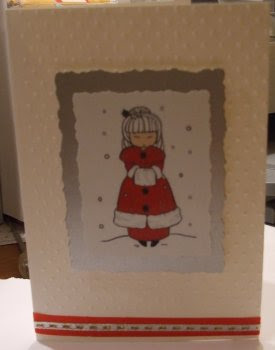
Here are a couple of cards I made before Christmas for my mum and niece. I wanted the cards to look elegant and came up with these two, which both used a freebie image, that I downloaded a while ago, which I just coloured in different colours using paintshop pro, on the PC. Both looked very different, but I was really happy with the way they turned out:


Both cards had been 'swiss dotted' through the cuttlebug, and for the green one (my mums favourite colour, I used Papermania 'Naughty and Nice' Christmas paper. Then just added some christmassy ribbon and silver backing card to both images.

A bit late, but my last minute Christmas cards ... part 2

I've had a busy few weeks, what with one thing and another, so haven't been able to update my blog lately. In between present wrapping, shopping and cooking I did manage to find a bit of time for some last minute Christmas cards that were needed, as was really pleased with the results. All of the cards were made using gift tags that I picked up in a local shop - 12 for £1.00, which I thought looked really cute: